In the Appium installation and Android connection, our goal is just to create an Appium session and see the test pass. This lesson just starts writing a test case with a beginning and an end: opening the Search screen of ApiDemos, entering content, sending the search, and checking the results.
If you are familiar with SeleniumLibrary, the initial feeling will be quite similar: still locators, actions, waits, assertions. But don’t carry the entire browser mindset over to mobile. A native application has no HTML, no CSS selectors, and doesn’t care how beautiful your div tag is.
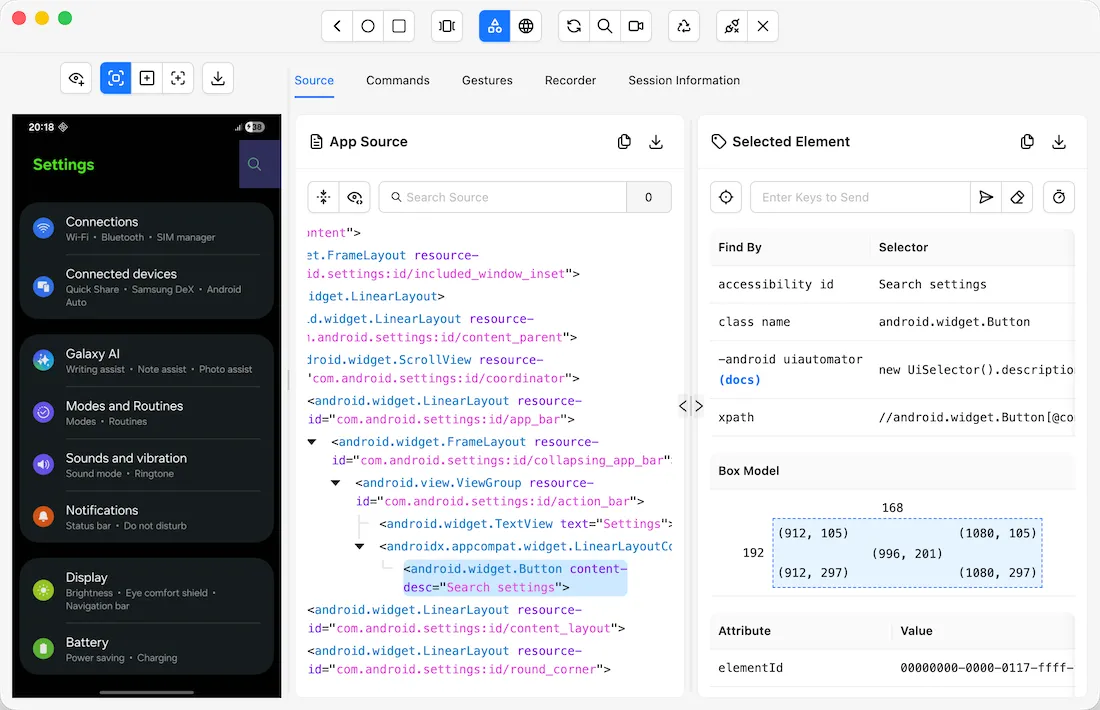
Three important areas are next to each other: the device screen, the XML hierarchy, and the suggested locator. Image: Appium Inspector (Apache-2.0). The image uses Android Settings to illustrate the mechanism; the test in the article still runs with ApiDemos.
What exactly is “DOM mobile”?
Automation people often call an element tree on mobile the DOM for short. More precisely, with native Android, UiAutomator2 takes an XML UI hierarchy from Android's accessibility and automation framework. Appium returns that hierarchy through the page source.
A node might look like this:
<android.widget.EditText
    resource-id="io.appium.android.apis:id/txt_query_prefill"
    text=""
    clickable="true"
    enabled="true"
    bounds="[24,180][1056,312]" />
This is not HTML. resource-id, content-desc, class, text, clickable, and bounds are Appium data used to find or interact with elements. When the screen changes, the page source may also change accordingly.
What parts does a mobile test case include?
The part of opening and closing a session is setup/teardown. The middle part is the test logic. Mixing all seven steps into each test case will still run, but after five cases you will have five identical capability blocks sitting obviously in the project.
Separate USB and AVD configuration
Create variables/android.py:
import os

APPIUM_URL = os.getenv("APPIUM_URL", "http://127.0.0.1:4723")
ANDROID_TARGET = os.getenv("ANDROID_TARGET", "avd")
ANDROID_UDID = os.getenv("ANDROID_UDID", "")
ANDROID_AVD = os.getenv("ANDROID_AVD", "Pixel_7_API_35")
APK_PATH = os.path.abspath("demoapp/ApiDemos-debug.apk")


def get_variables():
    capabilities = {
        "platformName": "Android",
        "automationName": "UiAutomator2",
        "app": APK_PATH,
        "appPackage": "io.appium.android.apis",
        "appActivity": ".app.SearchInvoke",
        "autoGrantPermissions": True,
    }

    if ANDROID_TARGET == "usb":
        if not ANDROID_UDID:
            raise ValueError("ANDROID_UDID is required when ANDROID_TARGET=usb")
        capabilities["udid"] = ANDROID_UDID
    elif ANDROID_TARGET == "avd":
        capabilities["avd"] = ANDROID_AVD
    else:
        raise ValueError("ANDROID_TARGET must be 'usb' or 'avd'")

    return {
        "APPIUM_URL": APPIUM_URL,
        "CAPABILITIES": capabilities,
    }
Robot Framework calls get_variables() when importing the variable file. The ${CAPABILITIES} dictionary always has a common part, then udid or avd is added depending on the target.
With USB:
$env:ANDROID_TARGET = 'usb'
$env:ANDROID_UDID = 'SERIAL_TU_ADB_DEVICES'
Với AVD:
$env:ANDROID_TARGET = 'avd'
$env:ANDROID_AVD = 'Pixel_7_API_35'
The test case does not contain IF target is a phone... ELSE target is an emulator.... It only accepts a complete set of capabilities.
Complete script
Create tests/search.robot:
*** Settings ***
Library         AppiumLibrary    timeout=10s
Variables       ../variables/android.py
Suite Setup     Mở ApiDemos
Suite Teardown  Close All Applications

*** Variables ***
${QUERY_INPUT}    id=io.appium.android.apis:id/txt_query_prefill
${SEARCH_BUTTON}  id=io.appium.android.apis:id/btn_start_search
${RESULT_TEXT}    id=android:id/search_src_text

*** Test Cases ***
Search With The Entered Query
    [Tags]    smoke    android
    Input Text    ${QUERY_INPUT}    Robot Framework
    Click Element    ${SEARCH_BUTTON}
    Wait Until Page Contains Element    ${RESULT_TEXT}    timeout=10s
    Element Text Should Be    ${RESULT_TEXT}    Robot Framework
    Capture Page Screenshot    search-result.png

*** Keywords ***
Mở ApiDemos
    Open Application
    ...    ${APPIUM_URL}
    ...    appium:options=${CAPABILITIES}
Suite Setup opens exactly one session for the suite. Suite Teardown closes all sessions even when an assertion fails. In real projects, there are cases where creating a new session for each test is necessary to ensure isolation, but that is a decision about data and startup cost; just seeing the phrase best practice doesn’t mean you should open and close the app continuously like turning disco lights on and off.
appium:options=${CAPABILITIES} collects capability into a dictionary. This method avoids a keyword with a twenty-line continuation when the capability increases.
In what order should the locator be chosen?
Resource-id
Input Text id=io.appium.android.apis:id/txt_query_prefill Robot Frameworkresource-id is usually the first choice because it is provided by the application for identification and does not depend on the element's position on the screen. If the Android team can add a stable ID for the element that needs to be tested, talk to them before writing an XPath long enough to qualify as official paperwork.
Accessibility id
Click Element accessibility_id=AppOn Android, the accessibility id usually maps to content-desc. It is convenient for automation and also shows that the element has a name for accessibility purposes. However, do not automatically consider all displayed text as an accessibility id; you must check the page source.
Android UIAutomator
Click Element
...    android=new UiSelector().text("App").className("android.widget.TextView")
This selector operates according to the Android mechanism and is useful when there is no ID but there is a sufficiently stable native attribute. Changing the app language makes the locator based on text potentially unreliable, so you need to know what you are trading off.
XPath
Click Element
...    xpath=//android.widget.TextView[@text="App"]
XPath is not forbidden. It is just usually slower and prone to breaking if it relies on the parent-child structure or index. Short XPath based on clear attributes is more tolerable; //android.widget.FrameLayout[1]/android.widget... dragged through ten layers and the interface just needs to sneeze for the locator to fall.
Action, wait, and assertion are not the same thing
Click Element    ${SEARCH_BUTTON}
Wait Until Page Contains Element    ${RESULT_TEXT}    timeout=10s
Element Text Should Be    ${RESULT_TEXT}    Robot Framework
Click Elementgửi action.Wait Until Page Contains Elementwait for the system to meet the conditions to be able to check.Element Text Should Beconfirms the expected operational results.
If written like this:
Click Element    ${SEARCH_BUTTON}
Sleep    5s
Element Text Should Be    ${RESULT_TEXT}    Robot Framework
then the test always charges for five seconds even if the app responds in 200 ms, but still fails if the device is slow and takes six seconds. Sleep is suitable when you intentionally observe or wait for a certain period; it is not a wait strategy.
Get source while writing locator
${source}=    Get Source
Log    ${source}
Get Source requests Appium to get the current XML hierarchy. It is useful for debugging but quite heavy; don't put it into every keyword just because 'you might need it'. When a locator is not found, taking a screenshot and source at the exact moment of the error is more valuable than reading the source from three steps earlier.
AppiumLibrary by default takes a screenshot when a keyword fails. You can also proactively add:
Capture Page Screenshot    before-submit.png
${source}=    Get Source
Log    ${source}    level=DEBUG
Run and read the results
Run the entire file:
robot --pythonpath . --outputdir results tests\search.robotRun the smoke tag separately:
robot --pythonpath . --include smoke --outputdir results testsWhen failing, read in order:
- Terminal to know which test and keyword failed;
results\log.htmlto see each keyword, argument, and screenshot;- Appium server log to know if the request reached the driver;
adb logcatif Appium reports that UiAutomator2 or the Android application has issues.
report.html is for the overview picture, while log.html is where the dissection happens. Just looking at each Element not found line in the terminal and randomly changing the XPath is like fixing a car by kicking each tire.